
 Song-saem: From Planner to Developer with AIBlog home →
Web App Code Structure: From Folders to What’s Inside a File (Build Your Own Scheduler, Part 4)
Opening AI-generated web app code for the first time, it’s hard to know where to look. Using example code from the scheduler, this post covers what each folder does, how the brief’s “information to save” becomes code, how to read the Today screen file in seven parts, and the order files work together when you tick a checkbox. Not memorizing syntax, but a map for finding where things happen.

How should you read web app code that AI wrote? Don’t try to understand it line by line; look at the structure first. Each folder has a role, and even a single file has its sections. Know those two things and you can follow which part of which file does the work when you tap a button. This is part 4 of the “Build Your Own Scheduler” series.
Why look at structure before code?
In part 3 we wrote a brief for a scheduler that manages school, work and personal tasks my own way. We decided to build only what we need at first, and to split the structure so features can be added as we use it. Hand that brief to AI and code appears quickly. But open it and there are dozens of files.
I was the same at first. As a planner I had read plenty of screen specs, but code felt like a foreign language. What helped was structure. Just as a floor directory lets you find your way in a big building, knowing what folders and files do lets you find what to change without reading everything.
Today we read that directory by comparing real code with explanations. No need to memorize syntax. Just look for where things happen.
1. Folders: what lives where?
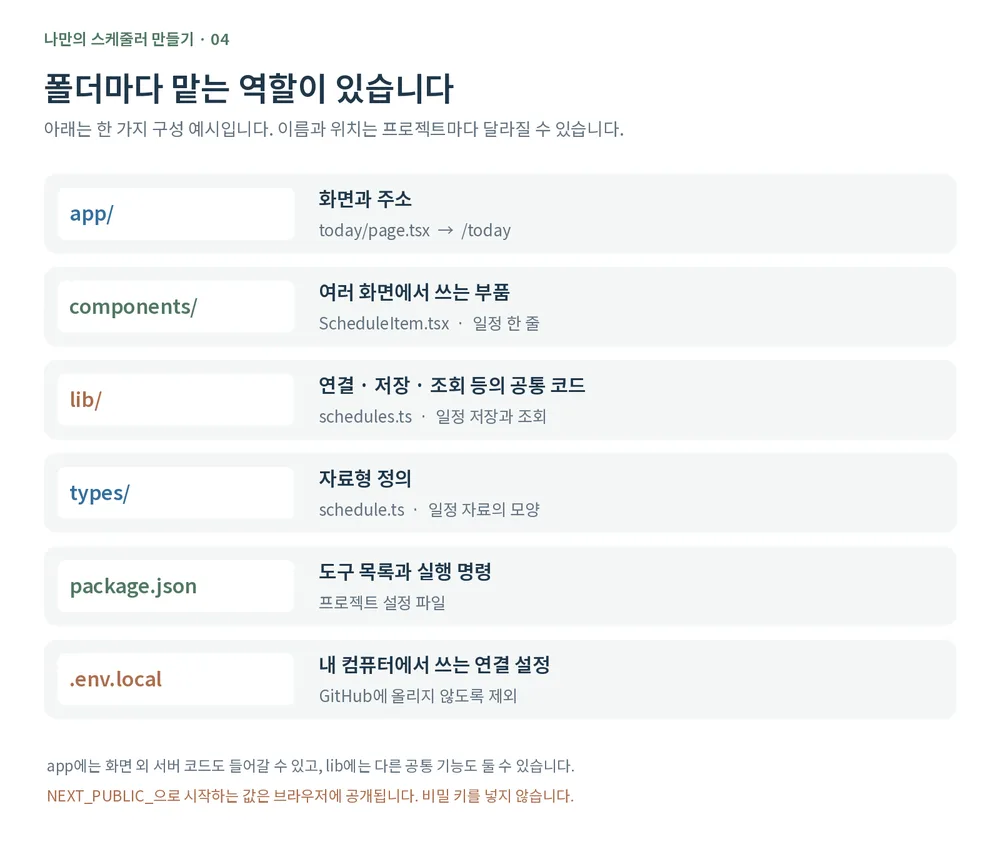
This scheduler splits files by role. Built with TypeScript, Next.js and Supabase as in the part 3 brief, the project looks roughly like this.
my-scheduler/
├─ app/                 pages and screens (one folder per address)
│  ├─ layout.tsx        frame around every screen
│  ├─ today/page.tsx    Today screen (/today)
│  ├─ week/page.tsx     This week screen (/week)
│  ├─ login/page.tsx    Login screen (/login)
│  └─ edit/page.tsx     Add/edit screen (/edit)
├─ components/          parts used on screens
│  ├─ ScheduleItem.tsx  one schedule row (checkbox + title)
│  └─ ScheduleForm.tsx  group of input fields
├─ lib/                 shared functions like connecting, saving, loading
│  ├─ supabase.ts       database connection
│  └─ schedules.ts      save and load schedules
├─ types/
│  └─ schedule.ts       shape of the data
├─ public/              images and icons
├─ package.json         list of tools and run commands
└─ .env.local connection settings on my computer (never pushed to GitHub)| Location | Role | Scheduler example |
|---|---|---|
| app | Pages and screens | Today, This week, Login |
| components | Parts used on screens | A schedule row, a group of inputs |
| lib | Shared functions: connect, save, load | Saving and loading schedules |
| types | Shape of the data | The promise that a schedule has a title, date and done flag |
| public | Images and icons | App icon |
| package.json | Tools and run commands | The command that starts the dev server |
| .env.local | Connection settings on my computer | Values needed to connect to the database |
For example, app/today/page.tsx is the Today screen and app/week/page.tsx is the This week screen. In Next.js, folders plus a page.tsx file create addresses like /today and /week.
The names aren’t all fixed. AI may put everything inside a src folder, or split shared functions into a folder with another name. app can hold server code too. What matters is keeping screens, parts and data handling in separate roles.
.env.local never goes to GitHub. And a value whose name starts with NEXT_PUBLIC_ is exposed to the browser, so never give a secret key that name.
2. How the brief’s “information to save” becomes code
In part 3 we decided a schedule needs a title, date, start time, memo and done flag. Moved into code, it looks like this.
// types/schedule.ts
export type Schedule = {
  id: string;
  title: string;
  date: string;
  startTime: string | null;
  memo: string | null;
  done: boolean;
};
Lots of English, but read it side by side with the brief and it makes sense.
| Code | In plain words |
|---|---|
id: string | The schedule number is handled as text |
title: string | The title is text |
date: string | The date is handled as text |
startTime: string or null | The start time is text, or may be empty |
memo: string or null | The memo is text, or may be empty |
done: boolean | Done is either true or false |
string means text, boolean means true or false, and null means no value. The vertical bar in string | null means “or.” done is true when finished and false when not.
Defining the shape like this lets TypeScript catch mistakes such as leaving out the title or putting text into the done flag. But date: string alone won’t tell you that “2026-99-99” is not a real date. Checking that a date is valid needs its own code.
This shows only what the screen uses. When saving, we also handle user information that tells whose schedule it is.
3. The Today screen file: code and explanation together
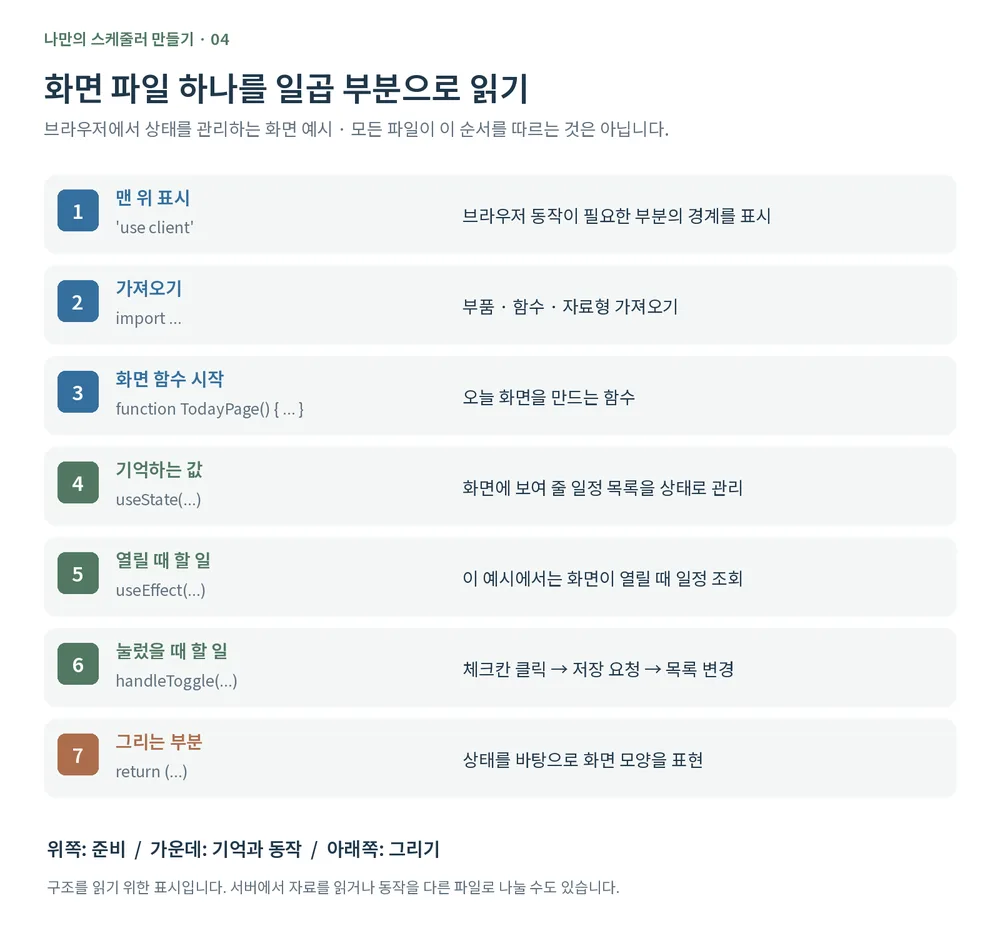
Now app/today/page.tsx, the Today screen file. It looks long, but just follow the seven numbers.
This is not a complete app but an example for reading structure. It assumes the parts and save functions it imports are ready in other files.
// ① Start of the part that interacts in the browser
"use client";

// ② Bring in what we need from other files and tools
import { useEffect, useState } from "react";
import ScheduleItem from "@/components/ScheduleItem";
import { getTodaySchedules, toggleDone } from "@/lib/schedules";
import type { Schedule } from "@/types/schedule";

// ③ The function that builds the Today screen
export default function TodayPage() {
  // ④ Remember the list of schedules to show now
  const [schedules, setSchedules] = useState<Schedule[]>([]);

  // ⑤ When the screen opens, load today’s schedules
  useEffect(() => {
    getTodaySchedules().then(setSchedules);
  }, []);

  // ⑥ When done is ticked, save and update the list
  async function handleToggle(schedule: Schedule) {
    const updated = await toggleDone(schedule);
    setSchedules((prev) =>
      prev.map((item) => (item.id === updated.id ? updated : item))
    );
  }

  // ⑦ What to show on screen
  return (
    <main>
      <h1>Today</h1>
      {schedules.map((schedule) => (
        <ScheduleItem key={schedule.id} schedule={schedule} onToggle={handleToggle} />
      ))}
    </main>
  );
}
Now compare the words that stand out in the code with what they do.
| No. | What to look for | What it does |
|---|---|---|
| ① | "use client" | Marks the start of a part that uses browser features like click handling and state |
| ② | import | Brings in the parts, functions and data shapes we need |
| ③ | function TodayPage | The function that builds the Today screen |
| ④ | useState | Remembers the list of schedules shown now |
| ⑤ | useEffect | In this example, loads today’s schedules after the screen opens |
| ⑥ | handleToggle | Groups what to do when done is ticked |
| ⑦ | return | Describes how the title and list should look |
Top is preparation, middle is memory and actions, bottom is drawing the screen.
Not every file follows this order. You can load data on the server first, and a small part may have no state or loading code. Think of the seven sections as a map for reading this example.
4. Two similar-looking lines do different jobs
At first I wondered, “Don’t both of these change the schedule?” These are the two lines in section ⑥.
const updated = await toggleDone(schedule);This line runs the save function in another file and waits for the saved result.
setSchedules((prev) =>
  prev.map((item) => (item.id === updated.id ? updated : item))
);
This part uses the saved result to update the list the screen remembers. It finds the schedule with the same number in the list and swaps only that one.
| Run the save function | Change screen state | |
|---|---|---|
| Code | toggleDone(schedule) | setSchedules(...) |
| What changes | The schedule stored in the database | The list the screen remembers |
| Purpose | Keep the change next time you open it | Show the change on screen now |
If you change only the screen and don’t save, a refresh can bring the old state back. If you save but don’t update the list, it’s saved yet looks unchanged on screen. That’s why it matters to see saving and updating the screen as separate jobs.
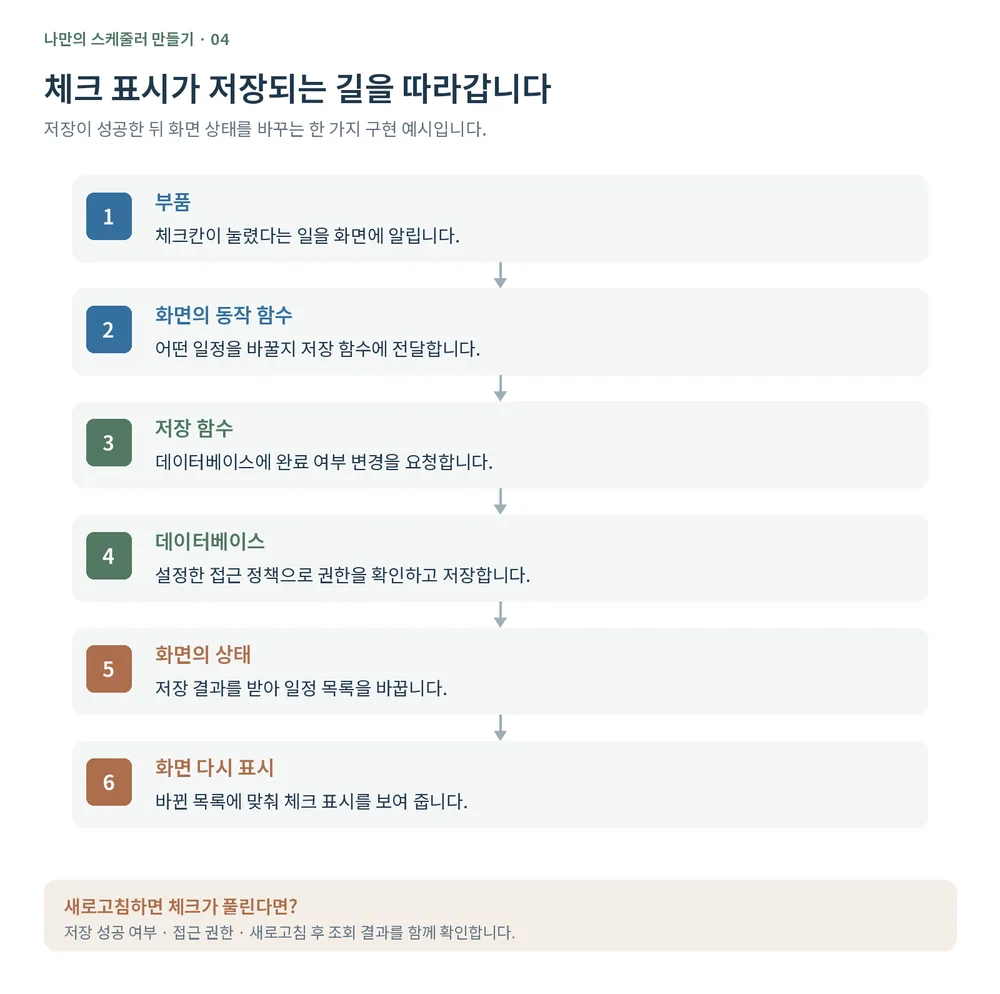
5. Tick a checkbox and the files connect like this
Now the other files. The part that draws one schedule row and the save function file look like this.
// components/ScheduleItem.tsx : one schedule row
import type { Schedule } from "@/types/schedule";

type Props = { schedule: Schedule; onToggle: (schedule: Schedule) => void };

export default function ScheduleItem({ schedule, onToggle }: Props) {
  return (
    <label>
      <input type="checkbox" checked={schedule.done} onChange={() => onToggle(schedule)} />
      {schedule.title}
    </label>
  );
}
// lib/schedules.ts : save the done flag to the database
import { supabase } from "./supabase";
import type { Schedule } from "@/types/schedule";
export async function toggleDone(schedule: Schedule): Promise<Schedule> {
const { data, error } = await supabase
.from("schedules")
.update({ done: !schedule.done })
.eq("id", schedule.id)
.select()
.single();
if (error) throw error;
return data;
}Let’s mark one schedule done on the Today screen. In this example the screen changes after saving succeeds.
- ScheduleItem.tsx tells the screen the checkbox was clicked.
- The Today screen’s handleToggle runs.
- toggleDone in lib/schedules.ts asks the database for the change.
- The database allows the change according to access rules set in advance and returns the updated schedule.
- setSchedules uses that result to update the list on screen.
- React reflects the changed list on screen.
To make the database handle only your own schedules, access rules must be set up separately. Adding login alone doesn’t solve it automatically. We’ll cover it in the saving and login part.
Knowing this path changes how you ask AI. Instead of “the checkbox doesn’t work,” you can say, “The check mark appears, but it clears after a refresh. Please check the save function and the part that reloads.”
6. Structure helps when you add features later
You may want to add due dates for school assignments, or priorities for work tasks. You may want to see only personal appointments. It’s a scheduler only you use, so the features you need differ from person to person.
Rather than just saying “add a priority feature,” try asking like this.
“I want to add priority to schedules. First explain which of these need to change: the data shape, the input screen, the save code, or the schedule display. Also tell me how it affects existing features.”
Even one priority field can change several files at once, like types, components and lib. With roles separated, it’s easier to check what AI is about to change.
7. Get it explained again with your own code
Your AI-built project may use different names or layout from today’s example. So it’s good to get an explanation based on your actual files.
“Show the main folders and files of this project in a table and explain each one’s role in one line. I’m new to development.”
“Show the actual code of the Today screen file in short pieces, with a simple explanation right under each piece. Don’t change the code.”
“When I tick done, tell me in order which function in which file runs. Separate the parts that only change the screen from the parts that save to the database.”
After the explanation, open the actual files and check that the same names and code are there. AI sometimes explains things wrongly.
You don’t need to memorize today’s code. It’s enough to find roles in folders, tell memory, actions and screen apart inside a file, and know how a button tap leads to saving. That’s how I started reading too.
In short
- Look at structure before reading line by line. app is screens, components are parts, lib is shared functions like connecting and saving, types is the shape of data.
- The brief’s information to save becomes the data shape in types. Whether a date is real still needs its own check.
- Read a screen file as preparation at the top, memory and actions in the middle, drawing at the bottom.
- Running the save function and changing screen state are different jobs. Miss one and it either clears after a refresh, or saves while the screen stays the same.
At ONE-PEX, the business system FROX has far more screens and files, but the basic principle of separating screens, parts and data handling is the same. So when we fix a feature, we first find “which folder, which section.”
Next (Part 5): At last we build screens ourselves. We hand AI the part 3 brief and today’s structure, and bring up the Today and This week screens on our own PC. We start with sample schedules to check how the screens and buttons work.
Sources (checked 2026-10-16)
- Next.js docs, Project Structure
- Next.js docs, Layouts and Pages
- Next.js docs, Environment Variables
- Next.js docs, use client
- TypeScript Handbook, Everyday Types (Union Types)
- Supabase docs, Row Level Security
Related reading: Build Your Own Scheduler, Part 1: Which language should you build a web app in? · Part 3: How to write a web app brief

A software planner who became a developer after two years of working with AI five to twelve hours a day. Today I build FROX, an AI-powered business system, at ONE-PEX.
More posts
- What Can You Build with AI?Orders in KakaoTalk, Stock in Excel, Receivables in a Notebook: Changing Messenger Orders Only the Owner Understands (Food Supplier, Part 1)
- What Can You Build with AI?I Fixed My TWA App, So Why Didn't It Change? What I Learned from the War with Caching
- What Can You Build with AI?Details Matter: Splitting 3D Characters and Vehicles So They Can Move (Building Road Voca 2, Part 5)